Hello there,
I hope you are all doing fine as we kick off 2024!
Among the most frequent questions I receive from Indie developers about marketing is how to create THE BEST capsules.
While I don’t personally create these visuals as a Brand Manager I excel at creating marketing briefs for artists. So let me give you some steps I make to craft my marketing brief, I even created a template so you won’t be missing anything when you need to brief your key art
STEP 1: HIRE A PROFESSIONAL IF YOU’RE NOT AN ARTIST YOURSELF.
Or ask the artist in your team.
Please do, capsules serve as windows to your game and will be the main click driver to your store page. So hire someone whose job is to create them.
You can go to Fiver, /gameDevClassifieds on Reddit or Social media. Ask for portfolios to make sure the artist’s style will fit your game.
Remember that selecting artists based on their styles acknowledges their experiences and pricing!
Having a qualitative capsule comes with a cost and takes time.
Of course, it’s best if you collaborate with an artist that fits your game aesthetics, fantasy, and genre.
STEP 2: DEFINE YOUR CREATIVE NEEDS PROPERLY TO GET THE RIGHT QUOTATION.
When briefing an artist, ensure you have all the assets you need in mind.
Here is a quick lists of what you should ask for
The main delivery AKA the Key Art
- A layered .psd format so you can make them move around if you have other specific needs.
- Request individualized elements in the final delivery.
- Request for the background to be filled out so you can move stuff around the art without having blank spaces.
- 4K format is 3840×2160 – you might not need it but you never know.
Social media assets
- A Twitter cover is 1500×500
- A Twitter profile picture is a minimum of 200×200
Preliminary sketches for validation.
- 2 or 3 rounds of sketches:
- 1 round to validate the overall direction of your Key Art.
- 1 round to confirm the correct element placement.
- A more detailed one before the final polishing
Steam mandatory assets :
- 7 Steam Capsule assets (details on Step 3)
- 2 icons for Steam
- Logo in different colors and formats for various usage (Black and White, another color for your key art, .png and .ai format)
STEP 3: FOCUS YOUR CREATIVE FEEDBACK WHERE IT MATTERS.
Now let’s dive into the detail of Steam’s format.
Capsule – full details here from Steam
Those are the main marketing elements of your game, they will be used on the Steam store page and for promotional purposes.
- Header Capsule* 460px wide x 215px tall – Most important asset as this is the primary static image for your game on your page.
Also featured in the “recommend for you” section, for fans of your genre or your studios.
Include key elements of your game to maximize clicks (more on that Step 7). - Small Capsule * 231px wide x 87px tall – The second most important format, it needs to convey your game title and at least one key element in a small format.
Goes into search results, new releases, and top-sellers. - Main Capsule * 616px wide x 353px tall – Goes into the top of the Steam Store Page, this is the best format to make your art shine. However, its visibility is tied to the success of your game to be featured there so don’t overspend time there.
- Vertical Capsule * 374px wide x 448px tall – Appears for Steam sales, this one is tricky because it needs adaptation to horizontal format. That being said a vertical version of your key art is very useful on social media so it’s a good resource investment.
- Page Background 1438px wide x 810px tall – Will be blurred when players visit your page, adds an extra layer of flavor to your Steam page.
Library elements represent your game in the Steam desktop launcher for game owners.
All details from Steam here
- Library Hero * 3840px wide x 1240px tall – Your main key art, the widest art to create so you should focus your feedback and creative process on this one first.
It needs to work with and without logo as per Steam request. - Library Capsule * 600px wide x 900px tall
- Library Header * 460px wide x 215px tall – same as Header Capsule
- Library Logo * 1280px wide x 720px tall – will be added to your Library Hero.
Community icons: – Appears in the full library list or as an icon on players’ desktops.
- Community Icon 184px x 184px
- Client Icon 32px x 32px .ico
STEP 4: CREATE A STRONG BENCHMARK.
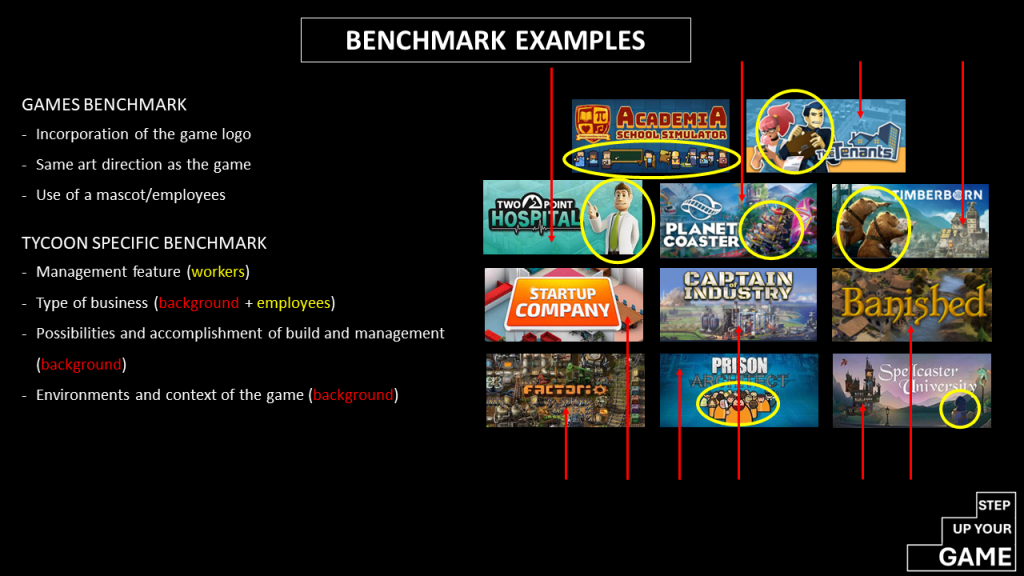
Start by observing how your competitors present themselves and what works best for them. Analyzing elsewhere often defines your aspirations, key differentiators, and unique selling points.
You should keep some common elements as they will be associated with your game genre and its competitors.
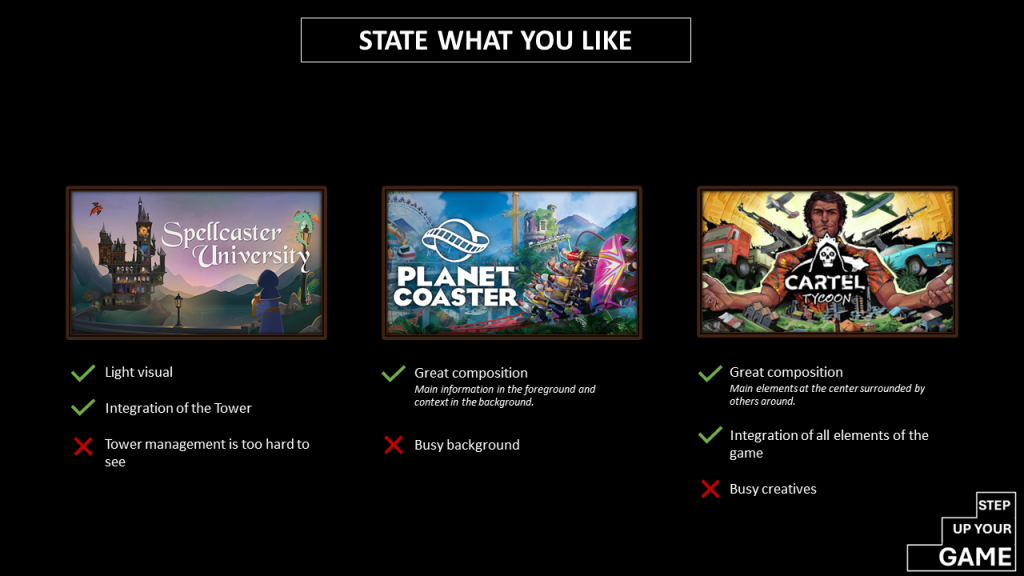
- Always state what you like and dislike about it to help artists know what you’re looking for.
- Use a mood board. PureRef is excellent for storing and overlaying benchmark images.
- Look beyond gaming for your benchmark.
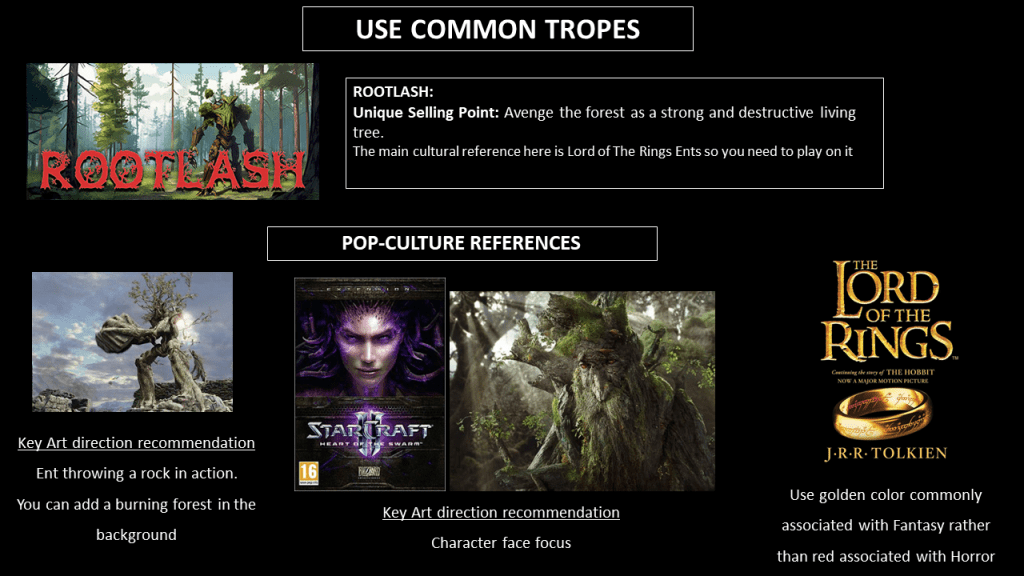
STEP 5: ENGAGE YOUR AUDIENCE WITH KNOWN TROPES.
Our brains are lazy and like to create commonalities with known elements immediately. Hence you need to find fitting known tropes that will directly speaks to your audience.
Leverage those familiar tropes that resonate with your audience’s subconscious should it be in the video game or wider entertainment industry.
COLORS
Employ red color if you have a horror game, gold for fantasy settings, or blue for a sci-fi space setting.
It’s as basic as that but it will unconsciously help your audience recognize key elements from your art. .
Couples of examples I’ve discussed on quickly with Rootlash and Nightmare Fuels developpers, appreciate they let me share that here.
Rootlash – NielsDev
Nightmare FUELS – Agregat Studio, Mateusz Filipiak
STEP 6: DEFINE THE MOOD OF YOUR GAME.
In your brief outline the emotional tone of your game.
This not only assists in selecting the right artist but also guides the overall art direction. Consider the essence of your game: what emotions do you aim to evoke in your players?
Emotions can be challenge, relaxation, power, having a good laugh while playing, fear and getting scared, paranoia, etc…
It also helps with to have the overall tone of the game, colorful, dark, fun, goofy, serious, joyfull, etc…
STEP 7: HIGHLIGHT SOME UNIQUE SELLING POINTS (USP) IN YOUR KEY ART.
Key arts excels in conveying a game’s setting, visual direction, and genre.
They are the immediate decision-makers for players to learn more about your game so use them to show your USPs.
However, conveying more than one or two USPs is very challenging in a static form and it small format (small capsule for Steam for example).
I don’t feel they’re too great at conveying purely the gameplay – that’s what your screenshots and trailers are for.
STEP 8: GET HELP FROM SOME USEFUL AND FREE PROGRAMS.
As recommended by Nightmare Fuels developer Agregat studio utilizes Krita for drawing, Gimp for editing, and PureRef for benchmarking.
As I work for publishers I usually work directly with artists and don’t use those but I’d be curious to know about them!
STEP 9: USE AI WITH CAUTION.
AI-generated arts are sources of extensive debate within the game development scene as you probably know. They are creating tough situations for artists.
I think you can’t replace the human factor behind the creation of an art. You’ll be loosing the emotions they are stimulating for us.
While I find AI can offer insights into potential directions be cautious about relying on it or sharing it with your artist.
I have the personal feeling it hinders and limits creativity which is key to crafting unique and distinctive art.
Thanks for the read,
Special thanks to Mateusz from Agregat Studio and NielsDev.